Pipet-Lite, XLS, XLS+ Calibration Instructions:
Printable Calibration Log
Printable Calibration Stickers (for use with Avery 5960 labels)
Link to product page: RA CT-2
Compatible with:
- Pipet-Lite
- Pipet-Lite XLS
- Pipet-Lite XLS+
- Pipet-Plus
This tool is used for increasing or decreasing the pick-up volume during the calibration process.
Review and follow the Rainin publication AB-15, Procedure for Evaluating Accuracy and Precision of Rainin Pipettes. Contact Us for a copy.
Be sure that the sealing system of the pipette (piston, tip holder, seal, and o-ring) is functioning properly. The pipette liquid end must be leak-free. If it is not, calibration will not be effective.
CALIBRATION:
Step 1:
Set the pipette to its minimum test volume according to the user’s manual (usually 10% of the nominal volume).
Step 2:
Pre-rinse the tip, dispense and weigh four individual samples. Determine the mean weight of the samples in micro-liters (µl). If the mean is not within accuracy limits, continue with the calibration.
Step 3:
Pull straight up on the plunger button to remove it.
Step 4:
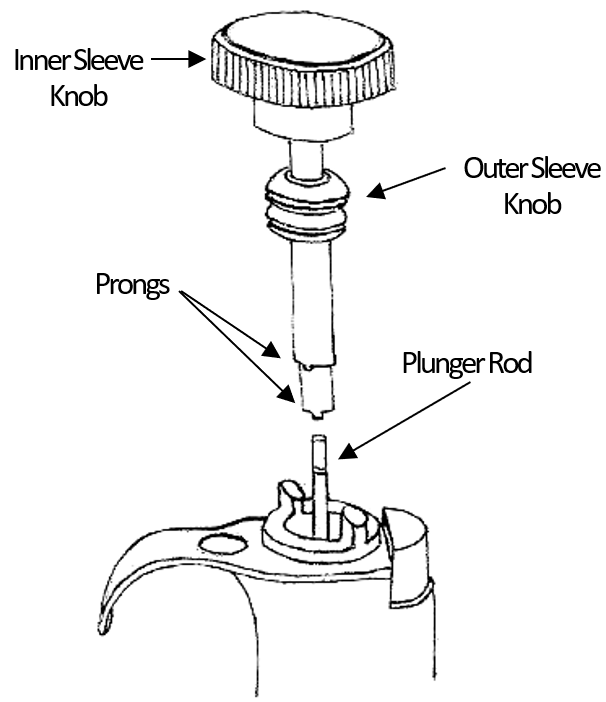
With the Pipet-Lite, XLS, XLS+ calibration tool arranged as shown in the Figure, slide the 2-piece tool over the plunger rod.
Step 5:
Turn the Outer Sleeve Knob of the calibration tool, pressing gently, until the two prongs on the end of the outer sleeve enter the two grooves in the pipette adjustment outer ring.
Step 6:
Turn the Inner Sleeve Knob of the calibration tool, pressing gently, until the two prongs on the inner sleeve enter the two grooves in the pipette adjustment inner ring.
Step 7:
To reduce pick-up volume: Hold the Outer Sleeve Knob stationary and rotate the Inner Sleeve Knob slightly clockwise.
Step 8:
To increase pick-up volume: Hold the Outer Sleeve Knob stationary and rotate the Inner Sleeve Knob slightly counterclockwise.
Step 9:
Remove the calibration tool. Replace the plunger button by aligning the flat of the plunger with the flat in the plunger button.
Step 10:
After completing these adjustments, check the instrument at 10% of nominal volume as described in step 1. If the pipette is within specification at 10% nominal value, continue to the next step. If not, return to step 1 and perform the procedure again until the instrument is within specification limits.
Step 11:
Set the pipette to its maximum volume and then perform the calibration test. If the instrument is within accuracy limits, then it has been calibrated successfully. If it is outside of the accuracy limits, return to step 1 and repeat the process.
“Pipet-Lite” and “Pipet-Plus” are registered trademarks of Rainin Instrument LLC.
Disclaimer: Any action you take using the information on this website is strictly at your own risk. The information herein does not constitute professional advice and is general in nature. We make no warranty that this information will meet your requirements, be safe, accurate, or error-free. Pipette Supplies, Inc. is not responsible for any errors or omissions, any results obtained from the use of this information, or any loss or damage arising out of the use of this information. This site is for educational purposes only.
Fair Use: Copyright Disclaimer under section 107 of the Copyright Act of 1976, allows for “fair use” for purposes such as comments, criticism, teaching, scholarship, news reporting, and research.
Fair use is permitted by copyright statute that might otherwise be infringing.
