Mentioned in this Pipetman Return Spring post:
- Gilson Pipetman Piston Return/Stroke Spring, Long: 52104 (The terms ‘return spring’ and ‘stroke spring’ refer to the same part)
- Gilson Pipetman Piston Purge/Blow-out Spring, Short: 52105 (The terms ‘purge spring’ and ‘blow-out spring’ refer to the same part)
- Pipetman Piston Assembly, P1000, P1000N, F250 to F1000: GI F123847
Step 1:
Press and hold the tip ejector button in the down position (figure 1.0) while detaching the tip ejector arm from the pipette body (figure 2.0). Figure 2.0 shows the tip ejector arm removed.

Step 2:
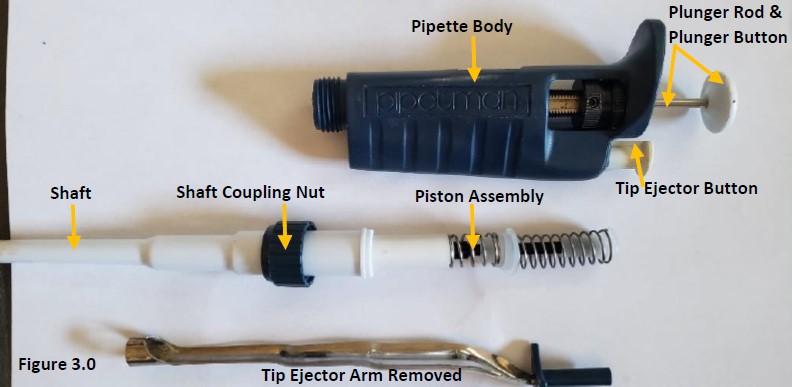
Carefully unscrew the coupling nut and shaft (figure 1.0) from the pipette body. There is an internal piston assembly and springs that may pop out when unscrewed and removed from the shaft (figure 3.0). Remove the piston assembly from the shaft and lay aside.
Step 3:
Remove the seal and o-ring from the piston and inspect for wear, dirt, and chemical splash. Lay them aside for replacement. Inspect the stainless-steel piston for wear, chemical splash, rust, pit mark or scratches. Replace piston
assembly if needed. NOTE: A new piston assembly (GI F123847) includes a return spring.

Step 4:
To replace the return spring (52104), press in and hold to collapse the spring (figure 5.0).

Step 5:
With the return spring still collapsed, firmly pull off and remove the piston cap from the piston stem and lay
aside. Allow the return spring to relax and return to normal length (figure 6.0).

Step 6:
In figure 7.0, the piston cap, return spring, return spring spacer, purge/blow-out spring spacer, purge spring (52105), seal retainer, stainless steel piston, seal, and o-ring are shown in order and orientation for reassembly.

Step 7:
Install and slide the stainless-steel piston into the seal retainer.
Step 8:
Re-install or install a new blow-out/purge spring (52105) onto the seal retainer.
Step 9:
Install a new purge spring spacer onto the purge spring, then install & seal the new return/stroke spring
spacer onto the purge spring spacer & return spring.
Step 10:
Install the piston cap back onto the piston stem. See figure 4.0 for correct assembly.
Step 11:
Insert piston assembly into the shaft (figure 3.0).
Step 12:
Screw the shaft with the shaft coupling nut back onto the pipette body (figure 2.0). Final assembly should look like figure 1.0.
Step 13:
After reassembly, allow the pipette to equilibrate for at least 60 minutes then confirm accuracy and precision on a 4-place balance. Re-check work if needed.
Related Posts:
Gilson Pipetman Push Rod Ejector Assembly Replacement
Counter Assembly Instructions for Gilson Pipetman / Rainin Classic
Styles of Gilson Pipette Tip Ejectors
Pipetman Calibration Wrench, Item # 27777
Disclaimer: Any action you take using the information on this website is strictly at your own risk. The information herein does not constitute professional advice and is general in nature. We make no warranty that this information will meet your requirements, be safe, accurate, or error-free. Pipette Supplies, Inc. is not responsible for any errors or omissions, any results obtained from the use of this information, or any loss or damage arising out of the use of this information. This site is for educational purposes only.
Fair Use: Copyright Disclaimer under section 107 of the Copyright Act of 1976, allows for “fair use” for purposes such as comments, criticism, teaching, scholarship, news reporting, and research.
Fair use is permitted by copyright statute that might otherwise be infringing.
