VWR UHP Preventive Maintenance Recommended Supplies:
- VWR UHP Pipette Lubricant
Pipette Supplies PN: LN SP29019 (1.5 grams)
Pipette Supplies PN: LN SP29021 (30 grams) - PM Parts: O-ring, seal, piston
- VWR Pipette Calibration Tool: LN SP19674
- VWR UHP Pipette
- Foam brush-lubricant application
- 4-5 place analytical balance
- Pipette Tips
- Di water or Distilled water
(All VWR UHP Single Channel Parts)
Optional UHP Preventive Maintenance Supplies:
- Kimwipes
- 70% IPA Alcohol
- Soft-Bristled Toothbrush

Step 1:
Carefully unscrew the liquid end assembly from the pipette body as shown in Figure 1.0.
Lay aside the pipette body for reassembly after preventive maintenance is completed.
Step 2:
Carefully unscrew the liquid end coupling nut from the tip ejector sleeve as shown in Figure 2.0.
Note: In Figure 2.0, you start to see the shaft assembly being exposed.

Step 3:
Carefully unscrew the piston assembly cap from the shaft assembly, per Figure 3.0
CAUTION: Be careful when unscrewing the piston assembly cap as the internal piston spring and components are under tension and may pop out.

Step 4:
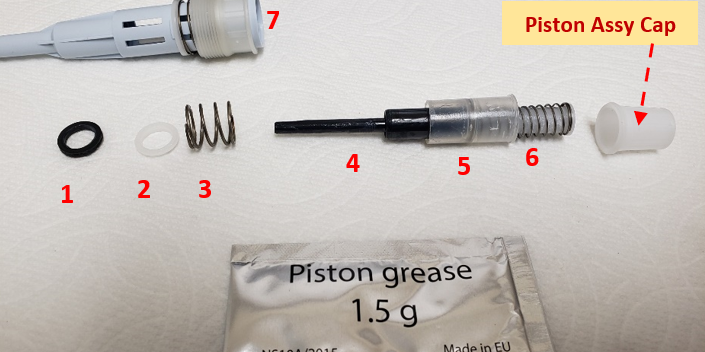
With the piston cap removed, the piston assembly and components are now visible for inspection, cleaning, preventive maintenance, and replacement as needed.
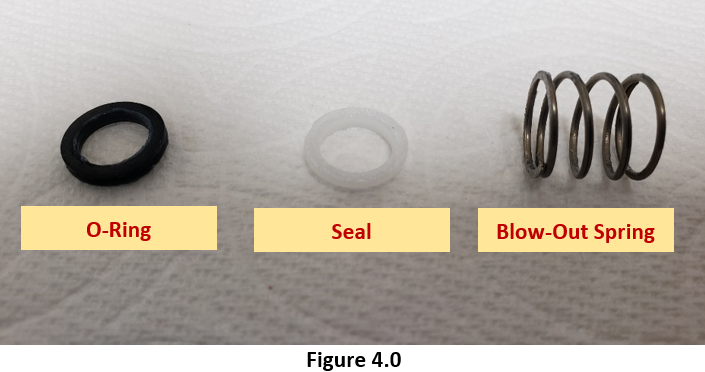
- O-ring
- Seal
- Blow-out spring
- Piston
- Piston Retainer
- Stroke Spring
Helpful Tip: Parts 1 through 6 comprise what is commonly referred to as the piston assembly.
Note:
At this stage, carefully inspect parts 1 and 2. These are one of the most critical components of the entire pipette and should be inspected, cleaned, and/or replaced routinely.
With a Kimwipe or lint-free towel and 70% IPA, remove any lubricant, debris, or chemical splash from the piston assembly (# 1 – #6) and the inside/outside of the shaft (#7).
Step 5:
Replace the old o-ring and seal with new parts. (All VWR UHP Single Channel Parts)
- Seals: replacement once every 12 months, based on usage
- O-rings: replacement once every 12 -24 months, based on usage
Step 6A:
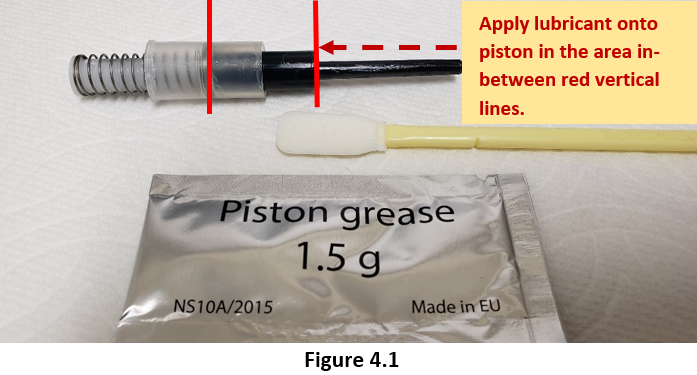
Once fully cleaned, apply a minute, but visible amount of piston lubricant (see page 1, PM Supplies Needed Section for part numbers) to a foam swab (DO NOT use cotton swabs as tiny stands of cotton may come off and mix with the lubricant).
Step 6B:
Carefully place a visibly light coat of lubricant onto the piston and retainer. Do not over apply the lubricant as accuracy and precision could be affected. See Figure 4.1.
Step 7:
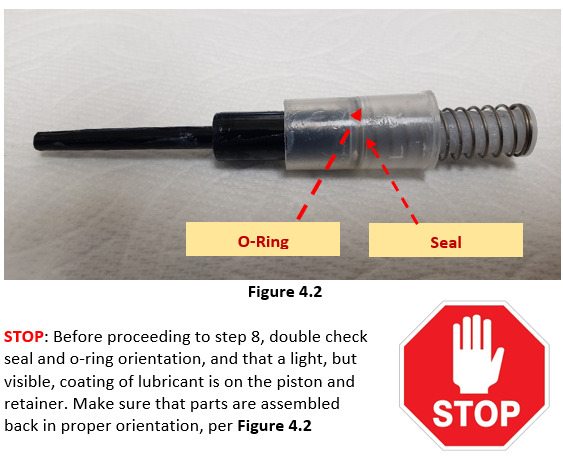
Install the new seal onto the piston, followed by the o-ring. See Figure 4.2
Note: It is very important that the seal is installed first, followed by the o-ring. DO NOT mix orientation, as it may affect accuracy and precision.
Step 8:
With a foam swab and 70% IPA, clean and swab the inside of the shaft to remove any debris, lubricant, or chemical splash that may have migrated inside of the shaft. Look for any visible wear, dullness, pit marks, or scratches on the shaft, ESPECIALLY in the area where the pipette tip seals to the shaft. Replace shaft as needed.
Pipette Reassembly After Completion of Preventive Maintenance
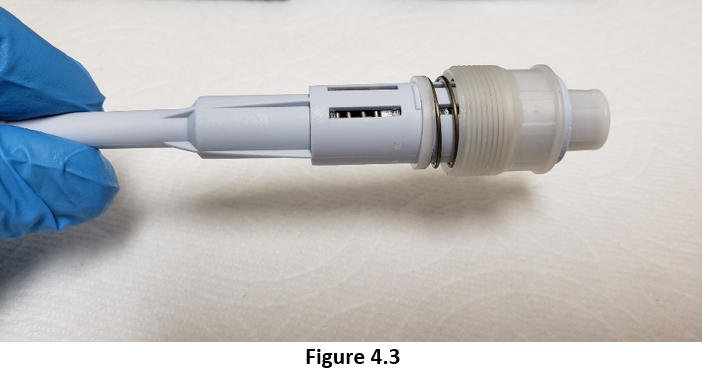
Step 9:
Place the piston assembly back inside the shaft. Carefully screw back on the piston assembly cap to secure the piston back inside the shaft as shown in Figure 4.3 above.

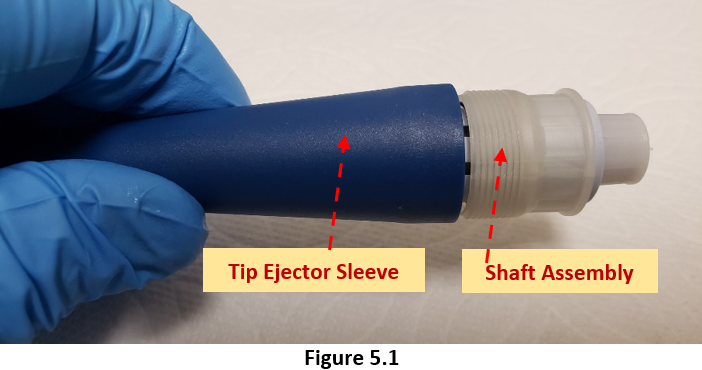
Step 10:
Clean and allow the tip ejector sleeve to fully dry. Once cleaned and dried, carefully screw the tip ejector sleeve back onto the shaft assembly as shown in Figure 5.1
Step 11:
Carefully screw the tip ejector and shaft assemblies back onto the pipette body until snug. See Figure 6.0

Helpful Tips:
Once the UHP pipette is fully reassembled after preventive maintenance:
1. Set the pipette volume to nominal (100%), install a pipette tip and aspirate Di water into the tip. Carefully withdraw the pipette and tip from the water and allow the water to remain in the tip for 15 seconds. REASON: to look for any visible leakage of water dripping from the tip. If there are No leaks, allow pipette to equilibrate. If there are visible leaks, recheck your work.
2. Allow the UHP pipette to equilibrate for at least 60 minutes upon completion of preventive maintenance. REASON: Pipette needs to equilibrate back to ambient conditions. Conditions that were caused by performing PM (heat of our hands, etc.) impact overall pipette performance.
3. After 60 minutes of equilibration, confirm the accuracy and precision of the pipette on a 4-5 place analytical balance. On some occasions, a calibration adjustment may need to be made only after rechecking your work and confirming the parts and PM actions are sound/good.
Printable Calibration Log
Printable Calibration Stickers (for use with Avery 5960 labels)
Disclaimer: Any action you take using the information on this website is strictly at your own risk. The information herein does not constitute professional advice and is general in nature. We make no warranty that this information will meet your requirements, be safe, accurate, or error-free. Pipette Supplies, Inc. is not responsible for any errors or omissions, any results obtained from the use of this information, or any loss or damage arising out of the use of this information. This site is for educational purposes only.
Fair Use: Copyright Disclaimer under section 107 of the Copyright Act of 1976, allows for “fair use” for purposes such as comments, criticism, teaching, scholarship, news reporting, and research.
Fair use is permitted by copyright statute that might otherwise be infringing.
