Instructions to calibrate a VWR EHP:
ATTENTION: Performing a calibration adjustment on any pipette should always be the last option, never the first. Performing a calibration adjustment as the first option, may mask underlying pipette performance issues that could affect both the short and long term health of your pipette. This could lead to costly repairs and part(s) replacement, and possibly the need to replace the pipette itself. Adjusting the pipette calibration should only occur if necessary and after the pipette sealing system (i.e.: piston, shaft, o-ring, lubricant, pipette tips) and other critical components are inspected to ensure good working condition. If not, replace part(s) as needed first.
Required Tools and Equipment:
- Calibration Tool part number: LN SP29334
- VWR EHP Pipette Tips or universal tips
- Di-Water (Non-Aerated)
- 4-5 Place Balance for Verifying Adjustments
Printable Calibration Log
Printable Calibration Stickers (for use with Avery 5960 labels)

Step 1:
To calibrate a VWR EHP, unlock the volume lock by pushing down on the black lock assembly as per the picture.
Note: If you have a fixed volume pipette, the calibration wheel is located underneath the cap. Pull the cap outward to access the calibration wheel and skip to Step 4.
Step 2:
Set the pipette volume to the 10% volume (i.e., 20uL for a 200uL pipette, 100uL for a 1000uL pipette, etc) and relock.
Step 3:
Remove the plunger button from the pipette and lay aside. NOTE: the plunger button may come apart into two pieces, which is okay.
Step 4:
Insert the calibration tool onto the plunger rod.
Step 4A:
Align the prongs of the calibration tool with the notches on the pipette calibration screw.


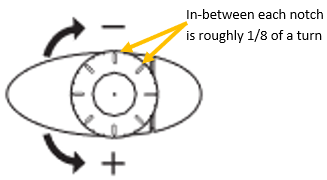
Step 5:
Rotate the calibration tool no more than an1/8 of a turn in the:
- Counter-Clockwise Direction (+) to increase the volume aspirated and dispensed.
- Clockwise Direction (-) to decrease the volume aspirated and dispensed.
Step 6:
After each calibration adjustment that is performed, verify the volume aspirated and dispensed on a 4-5 place balance. Readjust the calibration as necessary.
Step 7:
Remove the calibration tool from the pipette, reattach the plunger button. Pipette is now ready for use.

Disclaimer: Any action you take using the information on this website is strictly at your own risk. The information herein does not constitute professional advice and is general in nature. We make no warranty that this information will meet your requirements, be safe, accurate, or error-free. Pipette Supplies, Inc. is not responsible for any errors or omissions, any results obtained from the use of this information, or any loss or damage arising out of the use of this information. This site is for educational purposes only.
Fair Use: Copyright Disclaimer under section 107 of the Copyright Act of 1976, allows for “fair use” for purposes such as comments, criticism, teaching, scholarship, news reporting, and research.
Fair use is permitted by copyright statute that might otherwise be infringing.
